How to Install SonarQube Community Edition Using Docker on a Linux Server

Introduction
SonarQube is an open-source platform developed by SonarSource for continuous inspection of code quality to perform automatic reviews with static analysis of code to detect bugs, code smells, and security vulnerabilities in 20+ programming languages.
SonarQube provides various solutions, including the SonarQube Community Edition, SonarCloud, and SonarLint. In this article, I will delve into the SonarQube Community Edition, which is distributed under the LGPL v3 license and is free to use. This version is self-managed and can be hosted independently.
Installing Docker
Firstly, let's begin by installing Docker. You can install Docker by running the following commands in order:
sudo apt-get update

sudo apt-get install ca-certificates curl gnupg

sudo install -m 0755 -d /etc/apt/keyrings

curl -fsSL https://download.docker.com/linux/ubuntu/gpg | sudo gpg --dearmor -o /etc/apt/keyrings/docker.gpg

sudo chmod a+r /etc/apt/keyrings/docker.gpg

echo \
  "deb [arch="$(dpkg --print-architecture)" signed-by=/etc/apt/keyrings/docker.gpg] https://download.docker.com/linux/ubuntu \
  "$(. /etc/os-release && echo "$VERSION_CODENAME")" stable" | \
  sudo tee /etc/apt/sources.list.d/docker.list > /dev/null

sudo apt-get update
After running these commands in the terminal, you can execute the following code to check if Docker has been installed successfully:
sudo docker info
If you wish to run Docker without using 'sudo,' you can execute the following commands in order. However, it's important to note that creating the docker group grants root-level privileges to the user. For details on how this may impact the security of your system, refer to the Docker Daemon Attack Surface.
sudo groupadd docker

sudo usermod -aG docker $USER

newgrp docker
Creating Docker-Compose
For the next step, we will create a Docker Compose file. We will utilize PostgreSQL for our database and set the maximum RAM and CPU usage for SonarQube. You can run the following command to create the Docker Compose file:
nano docker-compose.yml
Next, you can paste the following contents into this file:
version: "3"
services:
  sonarqube:
    image: sonarqube:community
    deploy:
      resources:
        limits:
          cpus: '0.50'
          memory: 8192M
        reservations:
          cpus: '0.25'
          memory: 2048M
    hostname: sonarqube
    container_name: sonarqube
    depends_on:
      - db
    environment:
      SONAR_JDBC_URL: jdbc:postgresql://db:5432/sonar
      SONAR_JDBC_USERNAME: muratcan
      SONAR_JDBC_PASSWORD: yeldan
    volumes:
      - sonarqube_data:/opt/sonarqube/data
      - sonarqube_extensions:/opt/sonarqube/extensions
      - sonarqube_logs:/opt/sonarqube/logs
    ports:
      - "9000:9000"
  db:
    image: postgres:15
    hostname: postgresql
    container_name: postgresql
    environment:
      POSTGRES_USER: muratcan
      POSTGRES_PASSWORD: yeldan
      POSTGRES_DB: sonar
    volumes:
      - postgresql:/var/lib/postgresql
      - postgresql_data:/var/lib/postgresql/data

volumes:
  sonarqube_data:
  sonarqube_extensions:
  sonarqube_logs:
  postgresql:
  postgresql_data:
Starting with SonarQube
After creating the corresponding Docker Compose file, you can run the following command to start SonarQube:
docker compose up -d
Next, you can find the container ID by running this code:
docker ps
Retrieve the container ID from there and then run the following command to check the container logs:
docker logs -f 2de
You will likely encounter an error at this point, something similar to this:
ERROR es[][o.e.b.Elasticsearch] node validation exception
[1] bootstrap checks failed. You must address the points described in the following [1] lines before starting Elasticsearch. For more information see [https://www.elastic.co/guide/en/elasticsearch/reference/8.11/bootstrap-checks.html]
bootstrap check failure [1] of [1]: max virtual memory areas vm.max_map_count [65530] is too low, increase to at least [262144]; for more information see [https://www.elastic.co/guide/en/elasticsearch/reference/8.11/_maximum_map_count_check.html]
To resolve this issue, you need to run the following command:
sudo sysctl -w vm.max_map_count=262144
After running the previous command, execute the following command again:
docker compose up -d
When you check the logs of the container now, you should see that SonarQube is up and running. You can access SonarQube by typing the following in your address bar:
http://your-ip-address:9000
The default password for your SonarQube Community Edition is admin:admin. During your first login, you will be redirected to change your default password. Once you have completed this step, you will see a screen like this:

You can easily set up a DevOps platform from this screen and integrate your project with SonarQube. However, if you don't want to set up any DevOps platform and just want to run an analysis for your project, here's how you can do it.
Running SonarQube Analysis for Project

Firstly, we select 'Create a Local Project'.
Next, you will see a screen where you can fill in the project details according to your needs. After clicking 'Next,' you will encounter a screen for 'Clean as You Code' settings. You can either choose 'Use the global setting' or customize your settings based on your needs.
In the next screen, you can set up your analysis for pipeline integration. You have the option to choose from various popular selections such as GitLab CI, Azure Pipelines, Jenkins, etc. For the purposes of this article, I will select 'Locally.'
On the next page, you will encounter a token creation screen. Here, you can generate a token for analysis and set an expiration date for this token if needed.
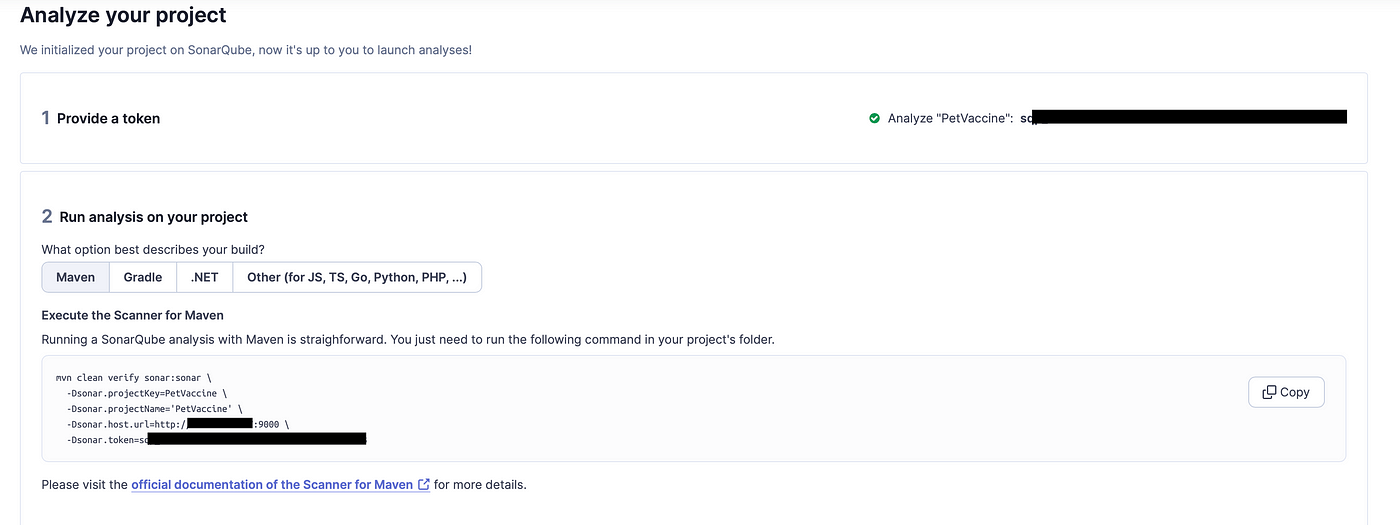
After creating the associated token, you can obtain the scanner script to run the analysis for your project.
After obtaining the relevant script, navigate to the project path and run the provided command. Once the analysis is complete, the page will automatically reload, and the results will be displayed.
Thank you for reading my article. Happy coding!
