
How to Create a Slack Bot with Spring Boot
Introduction
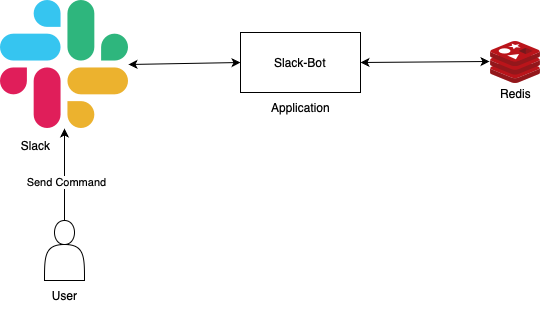
In this post we are going to walk you through the process of building and deploying a Slack bot that listens to your conversations, and perform some operations according to given commands.
In today's micro services driven architecture, Redis has become an essential component for caching, session management, and as a message broker. However, monitoring and managing Redis instances often requires direct access to command-line tools or specialized dashboards, creating friction for teams who need quick insights or the ability to make simple changes.
What if your team could interact with Redis directly from where they already communicate — Slack? In this article, I'll walk you through how I built a Redis Cache Manager Slack Bot that lets you perform common Redis operations without leaving your Slack workspace.
Create a Slack App
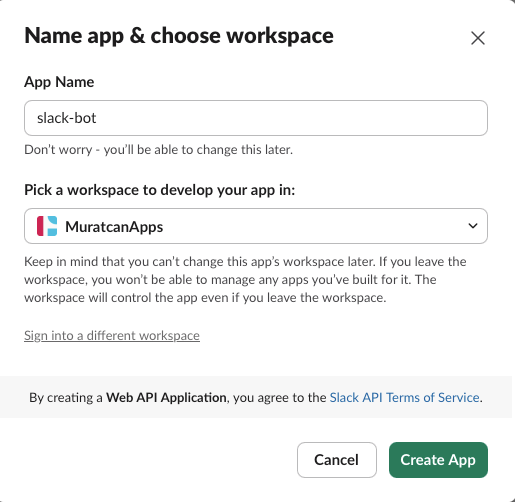
First, go to the Slack API site and click "Create New App" button. You will see a screen like below, you need to select "From scratch" option.

Pick a proper name for your application and select the workspace you want to install it in.
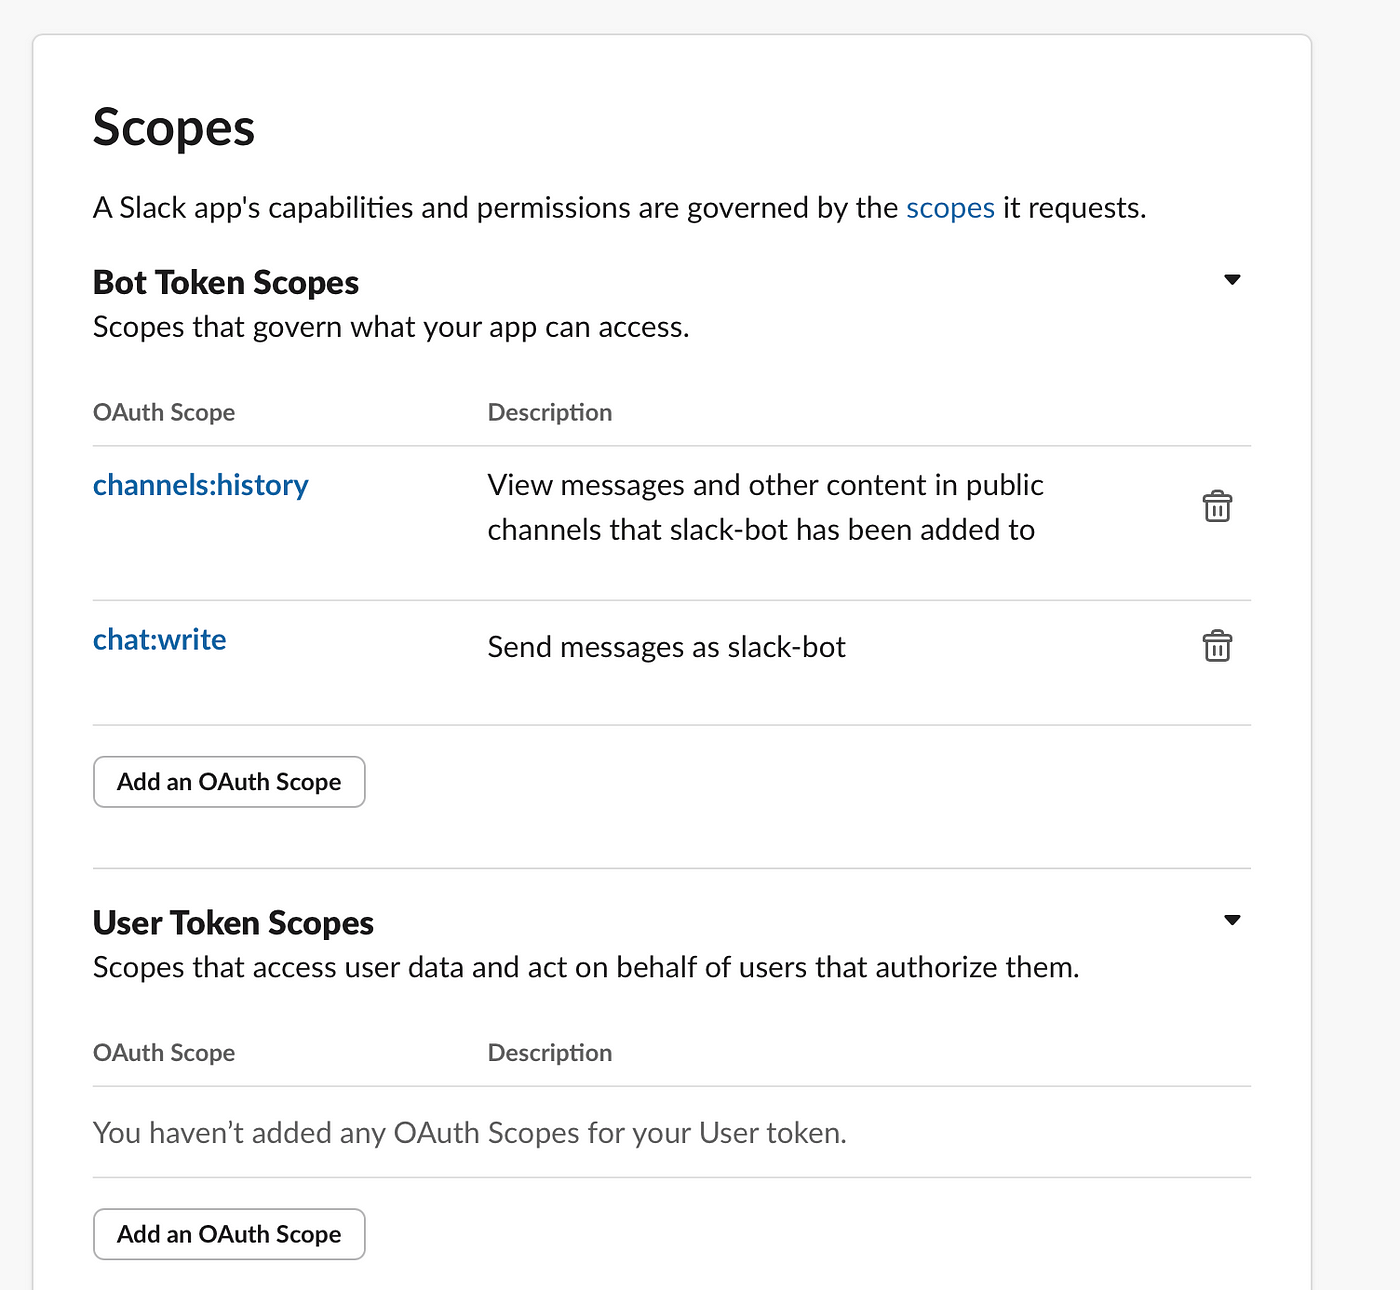
After that, you will see a page with information and options about your application. Then, you should select OAuth & Permissions from left menu. This will bring you to the "Scopes" screen, where you'll need to add all the scopes you see in this picture, namely:
channels:history— this lets your app see previous messages in channelschat:write— this lets your app send messages
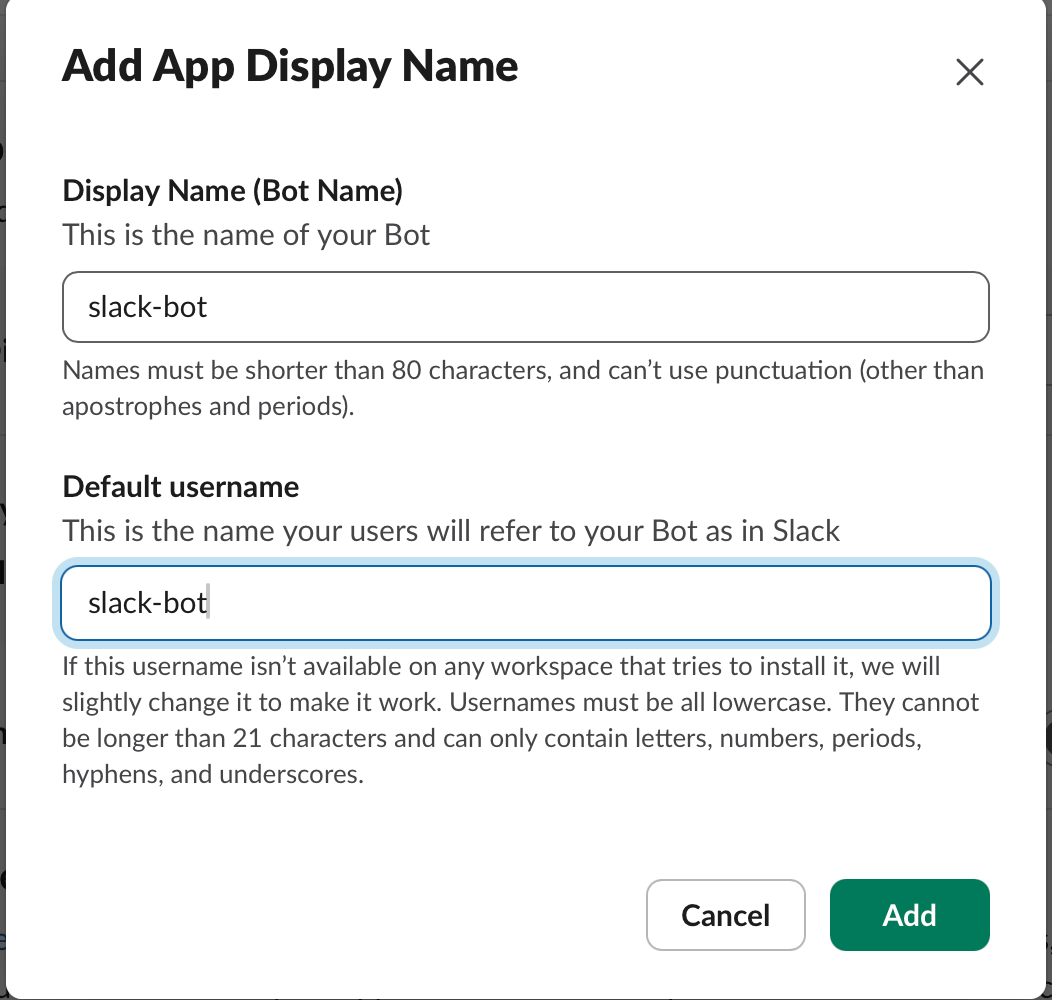
Next, select "App Home" from the left menu and click the "Edit" button next to the App Display Name.
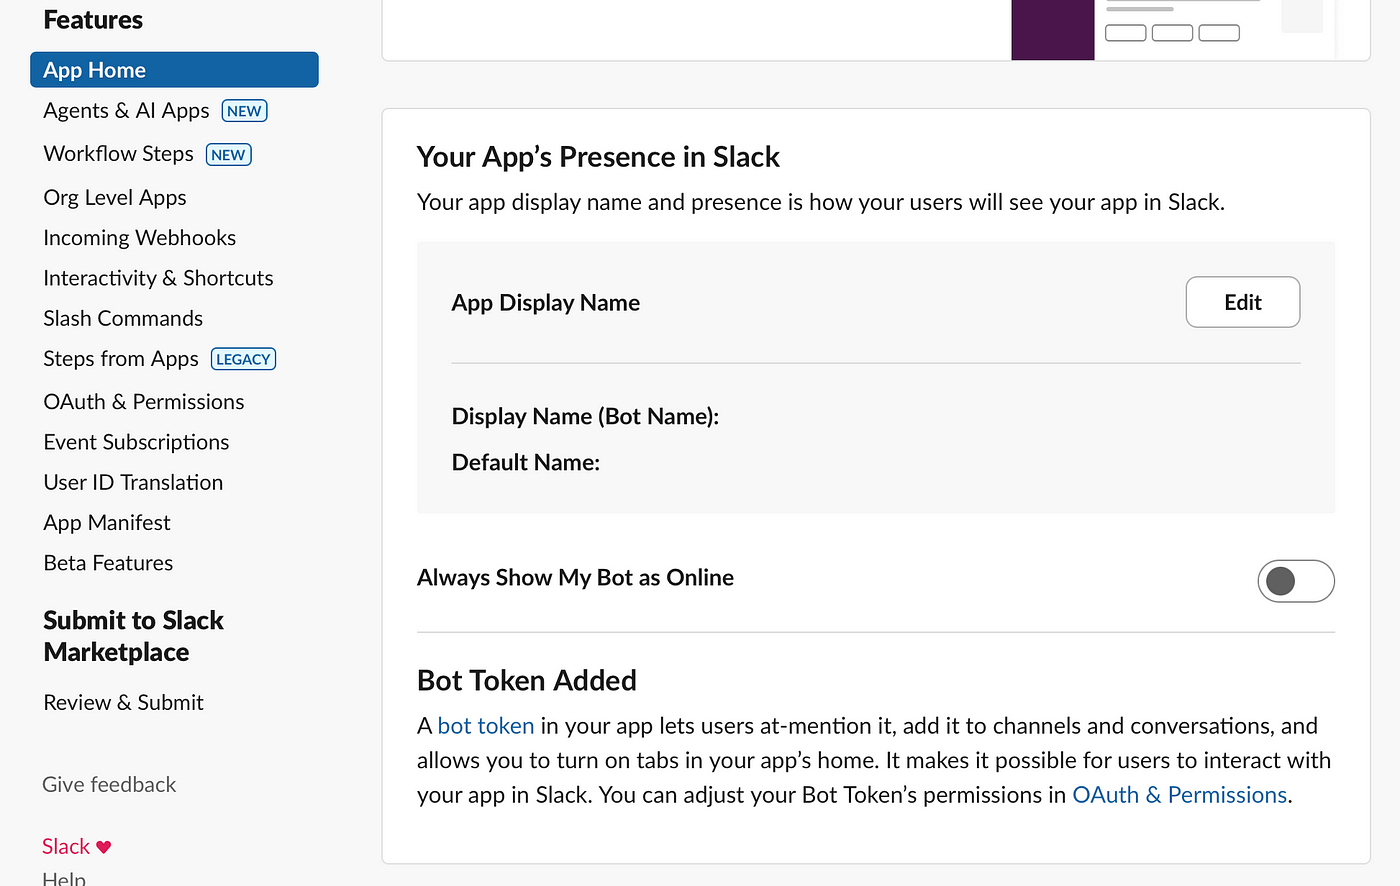
This will bring you to the this screen below. At this page you should select a display name and username for your bot.
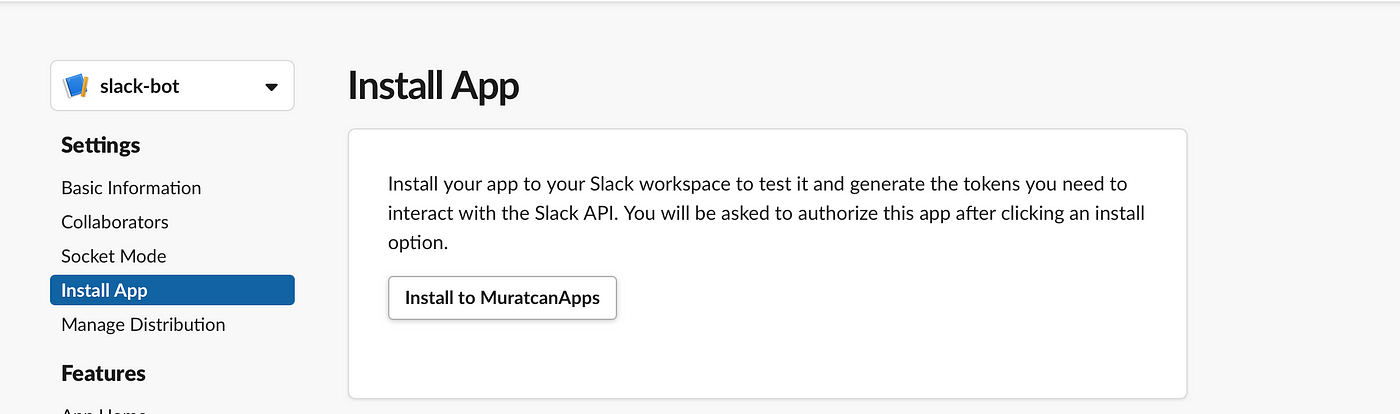
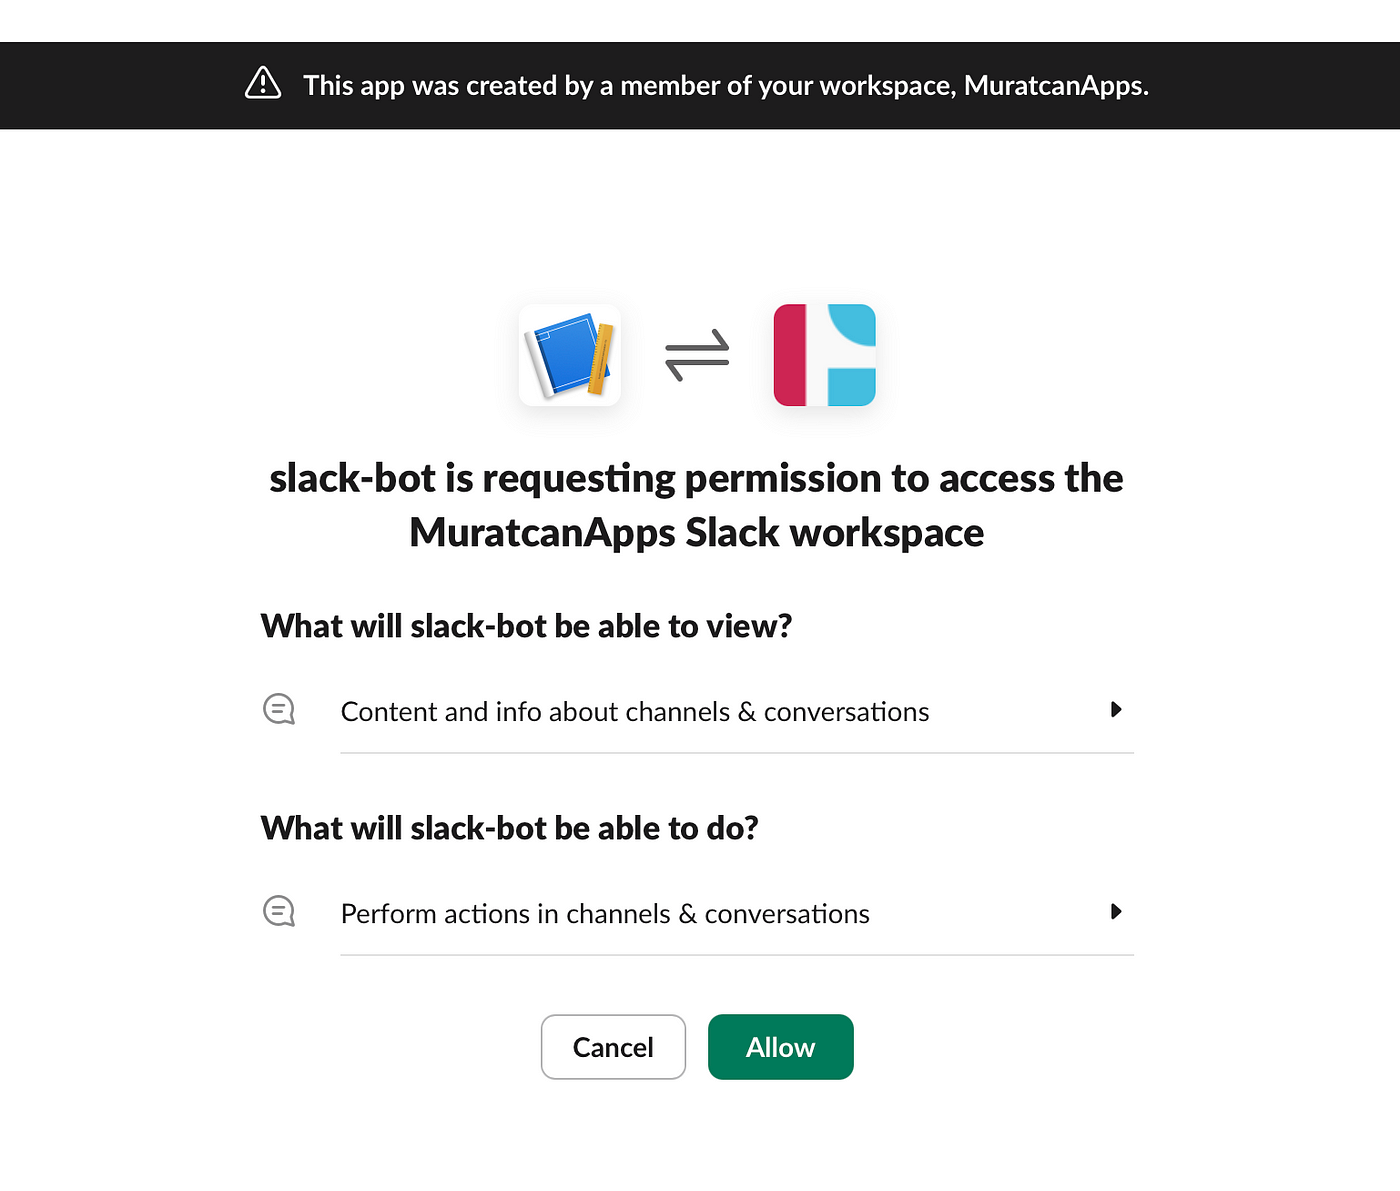
After clicking the "Add" button, you can select "Install App" from the left menu and click the relevant button to install this application in your workspace.
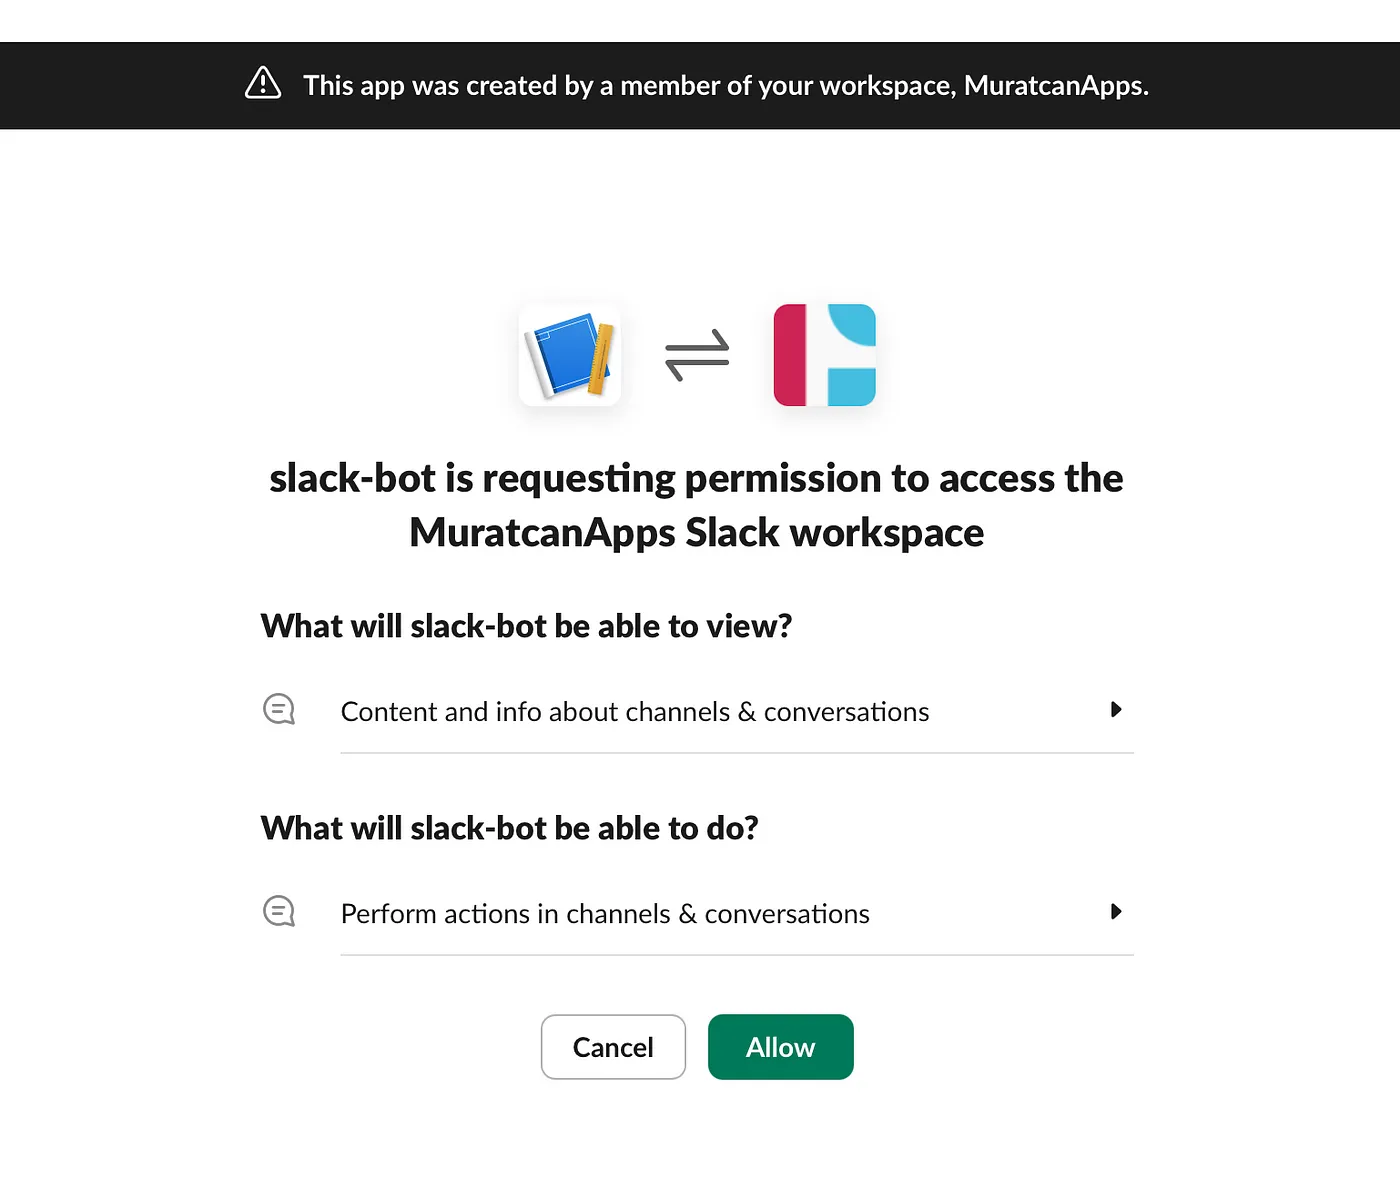
Then, a permission screen will open. Review the abilities of the bot and click "Allow".
This will bring you to a screen displaying your bot token information, which starts with xoxb-. You should copy and store it in a safe place we will use it later. In case of you forgot this step you can always come back this page and copy your bot token.
Channel Creation and Adding Your Bot
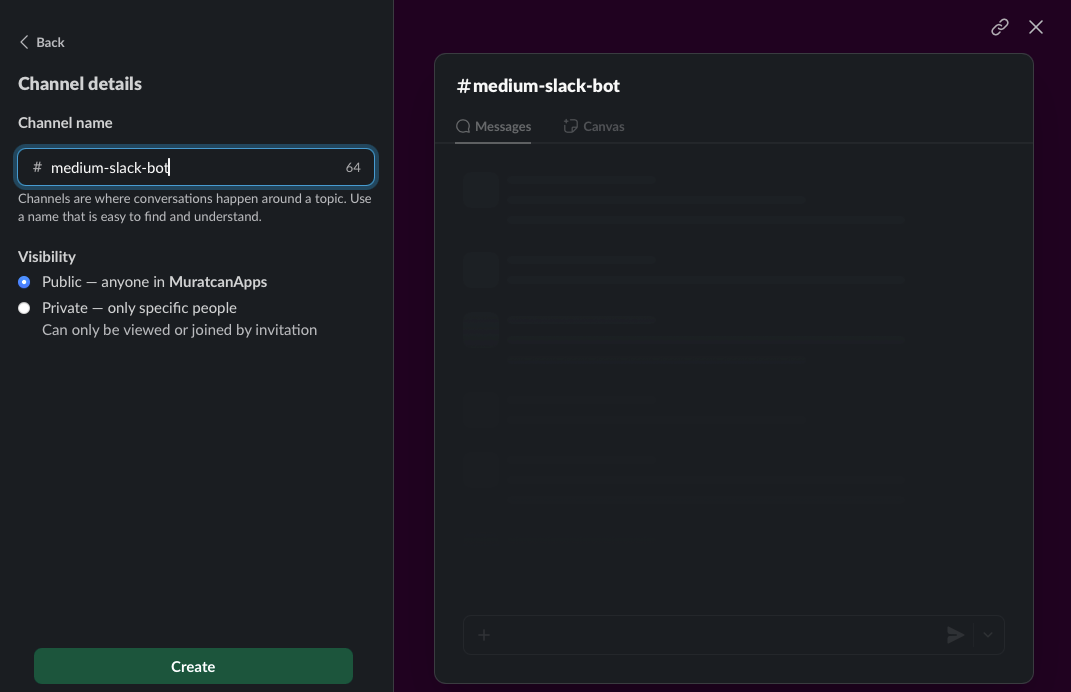
After creating your application, you should head back to your Slack page and create a channel for your bot.
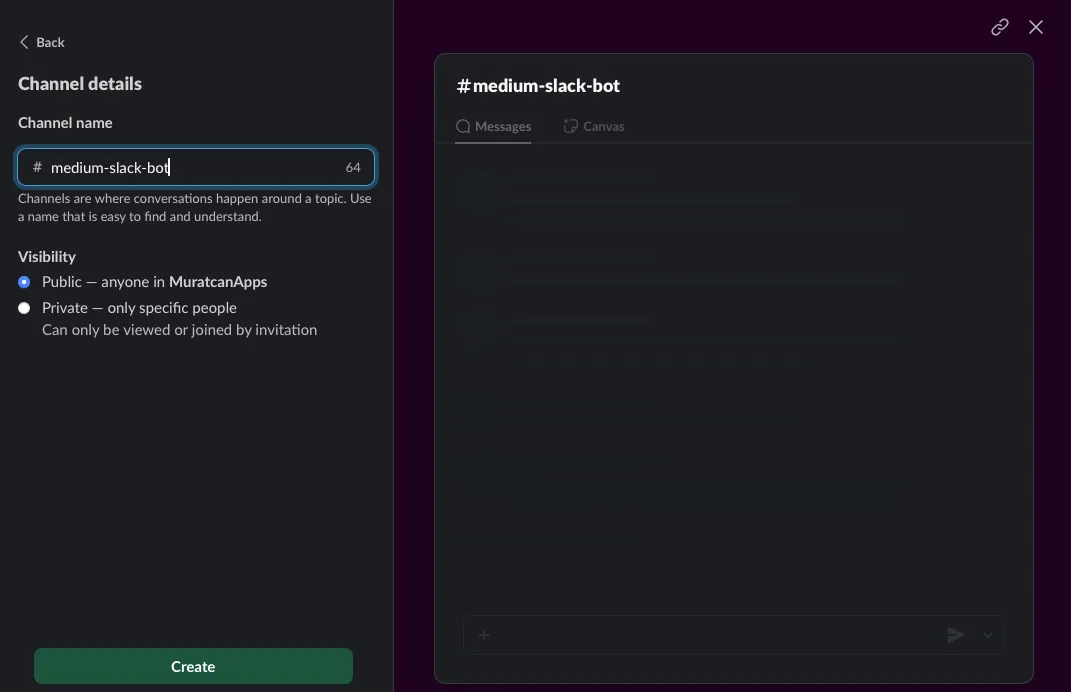
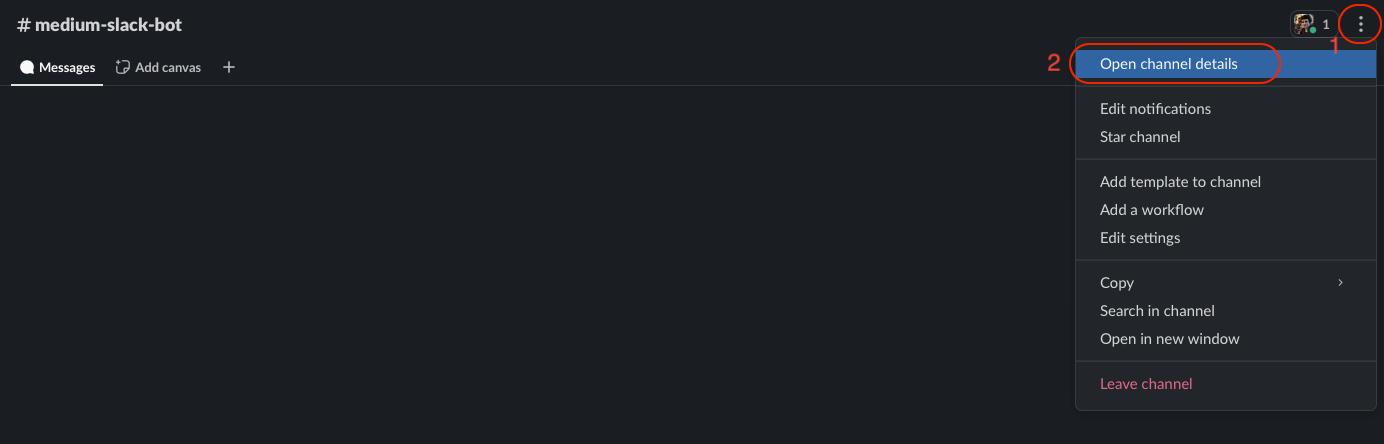
You can choose a name for your channel and create it. After creating the channel, send a message mentioning your bot's name. For example, if your bot's name is "slack-bot", you should send a message with "@slack-bot".
After sending this message, a pop-up will appear. You should select the "Add to Channel" option from this pop-up. Once completed, your bot will have access to this channel and be able to read the channel history.
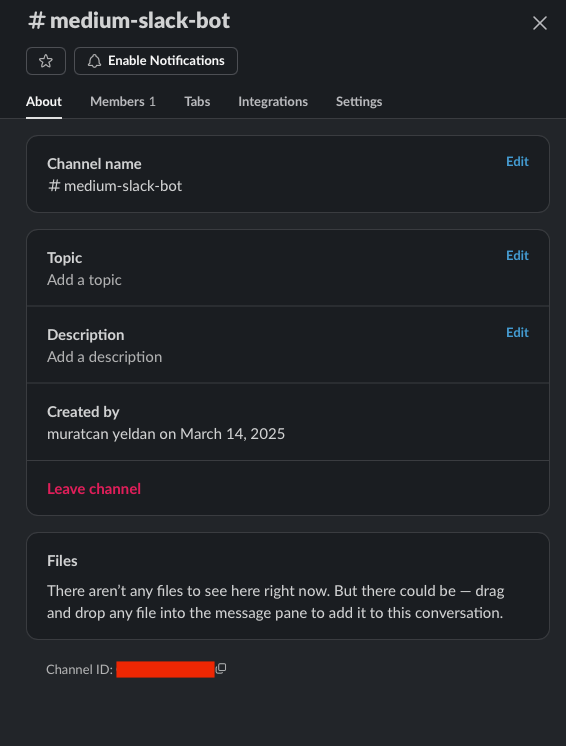
Now, click the three dots at the upper right side of the channel and then click "Open Channel Details".
In the pop-up, you will see the "CHANNEL ID", which you will need as an environment variable for your bot.
Let's Code
After completing the slack application parts we can start the coding process. This is the where fun begins.
Slack Configuration
Firstly, we need to create two configurations for our Slack bot.
@Configuration
@RequiredArgsConstructor
public class SlackConfig {

 @Bean
 public Slack getInstance() {
  return Slack.getInstance();
 }
}

@Configuration
@RequiredArgsConstructor
public class SlackMethodsClientConfig {

 private final SlackProperties slackProperties;
 private final Slack slack;

 @Bean
 public MethodsClient methods() {
  return slack.methods(slackProperties.getToken());
 }
}
Redis Configuration
Since this application is designed to perform Redis operations, we also need to create a Redis configuration:
@Configuration
public class RedisConfig {

    @Bean
    public RedisTemplate<String, String> redisTemplate(RedisConnectionFactory connectionFactory) {
        RedisTemplate<String, String> template = new RedisTemplate<>();
        template.setConnectionFactory(connectionFactory);
        template.setKeySerializer(new StringRedisSerializer());
        template.setValueSerializer(new StringRedisSerializer());
        return template;
    }
}
Bot Command Handling
Next, create a component that defines the bot's behavior in response to specific commands. Below is an example component where we define a few commands and configure actions:
@Service
public class SlackCommand {

 private final Map<String, SlackCommandStrategy> slackCommandStrategyMap = new HashMap<>();
 private final SlackService slackService;

 public SlackCommand(ListableBeanFactory beanFactory, SlackService slackService) {
  this.slackService = slackService;
  beanFactory.getBeansOfType(SlackCommandStrategy.class)
    .values()
    .forEach(service -> slackCommandStrategyMap.put(service.getCommandName().trim(), service));
 }

 public void process(String commandName) {
  try {
   if (commandName.startsWith(GET) || commandName.startsWith(SET) ||
     commandName.startsWith(DELETE)) {
    processCommand(commandName);
   } else {
    processSimpleCommand(commandName);
   }
  } catch (Exception e) {
   slackService.sendPostMessage("Error processing command: " + e.getMessage());
  }
 }

 private void processCommand(String commandName) {
  String command = commandName.split("\\s+")[0];
  switch (command) {
   case GET -> slackCommandStrategyMap.get(GET).process(commandName);
   case SET -> slackCommandStrategyMap.get(SET).process(commandName);
   case DELETE -> slackCommandStrategyMap.get(DELETE).process(commandName);
   default -> slackService.sendPostMessage("Unknown command. Type HELP for available commands.");
  }
 }

 private void processSimpleCommand(String commandName) {
  switch (commandName) {
   case HELP -> slackService.sendPostMessage(HELP_MESSAGE);
   case PING -> slackService.sendPostMessage(PING_MESSAGE);
   case LIST_ALL -> slackCommandStrategyMap.get(LIST_ALL).process(commandName);
   default -> slackService.sendPostMessage("Unknown command. Type HELP for available commands.");
  }
 }
}
Strategy Pattern for Command Handling
We use the strategy pattern for this application. Below is an example implementation for the "GetStrategy":
@Component
@RequiredArgsConstructor
public class GetCommandStrategy implements SlackCommandStrategy {

 private final SlackService slackService;
 private final RedisTemplate<String, String> redisTemplate;

 @Override
 public String getCommandName() {
  return GET;
 }

 @Override
 public void process(String message) {
  String key = message.replace(GET, "").trim();
  String value = redisTemplate.opsForValue().get(key);

  if (value != null) {
   slackService.sendPostMessage("Value for key '" + key + "': " + value);
  } else {
   slackService.sendPostMessage("No value found for key: " + key);
  }
 }
}
First Run
Firstly, we create a Dockerfile for our bot:
FROM maven:3.9.9-eclipse-temurin-21 AS builder
WORKDIR /build
COPY pom.xml .
COPY src ./src
RUN mvn clean package -DskipTests

FROM eclipse-temurin:21-jdk
WORKDIR /app
COPY --from=builder /build/target/*.jar app.jar
ENTRYPOINT ["java", "-jar", "app.jar"]
Then we create a docker-compose.yml:
services:
  app:
    build: .
    ports:
      - "7200:7200"
    environment:
      - BOT_TOKEN=${BOT_TOKEN}
      - CHANNEL_ID=${CHANNEL_ID}
      - BOT_USERNAME=${BOT_USERNAME}
      - REDIS_HOST=redis
      - REDIS_PORT=6379
    depends_on:
      - redis

  redis:
    image: redis:latest
    ports:
      - "6379:6379"
    volumes:
      - redis_data:/data

volumes:
  redis_data:
Now we create a .env file for your docker compose. Here is an example .env file below:
BOT_TOKEN=xoxb-your-slack-bot-token-here
CHANNEL_ID=your-slack-channel-id-here
BOT_USERNAME=your-bot-username-here
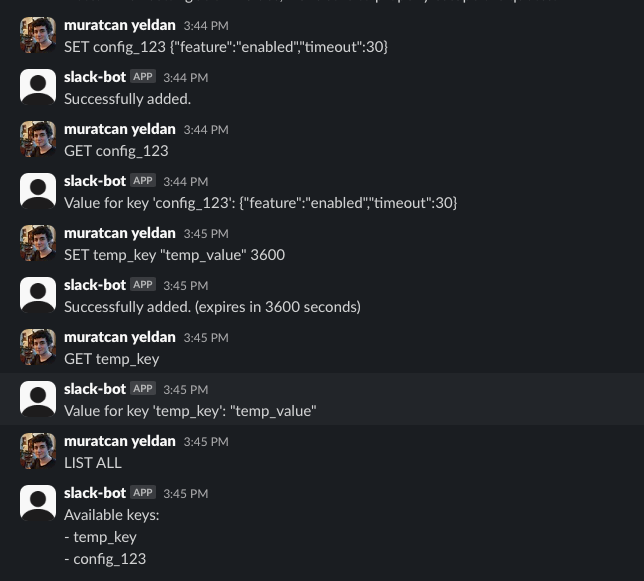
After that you can use docker compose up -d --build to start your bot. Then your bot will be up and running. You can try your bot with sample commands.
You can find my example project here.
Thank you for reading, and happy coding!